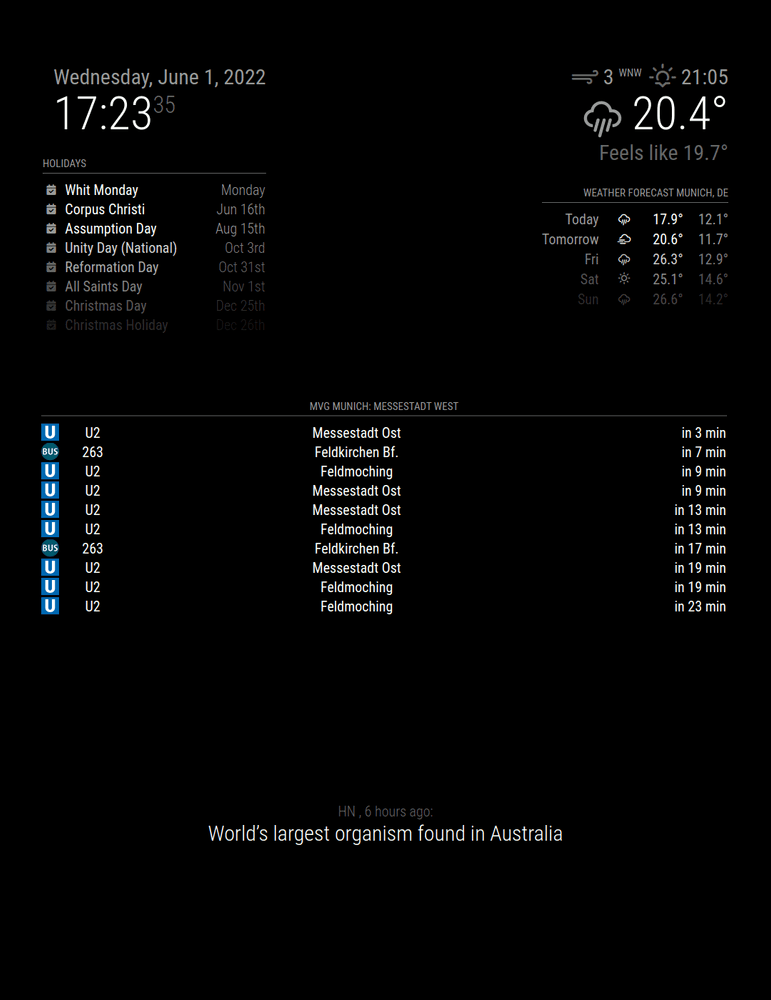
Dashboard with Magic Mirror² on Raspberry Pi
Magic Mirror² is an open source application suitable for creating dashboards for home or business use. It has an extensive ecosystem of third-party plugins to display information from different data sources. In this article, I want to show how to set up a dashboard with Magic Mirror² on a Raspberry Pi.
Dashboards
Dashboards are a type of graphical user interface that provide an at-a-glance view of useful information. For business use, this type of user interface usually include metrics like KPI (key performance indicators). Having this overview of important metrics makes it easier and faster for management to act in response to changes in the metrics.
But dashboards can also be useful for private use to display relevant information in the home. For me useful, information is for example the current weather in my city, current news, or simply an important message from my friend on Twitter.
With the free Magic Mirror² software, you can build such a system.
Magic Mirror²
The open source software is called "Magic Mirror" because it was originally built for a smart mirror system that displays useful information for home use. But it can also be used without a mirror as I will show in this article.
Originally created by Michael Teeuw with first commits to GitHub in 2014. This project now has over 200 contributors on GitHub and 16.6k stars (May 2022).
The software is built using JavaScript and Electron. Electron is basically a browser adapted to build desktop apps using web technology. Magic Mirror² has an easy mechanism for programmers to extend and adapt the application with custom functionality. These third-party extensions are called "modules" and there exists a grand variety of them ready to be installed.
Raspberry Pi
Raspberry Pi is a popular single-board computer (SBC). The Magic Mirror² project was specifically developed to work with the Raspberry Pi system. Due to the current shortage of Raspberry Pis, other SBCs running Linux might also work with Magic Mirror². For the purpose of this project I use a Raspberry Pi 3B+.
Samsung Monitor
As the display for showing the dashboard, I purchased a monitor from Samsung. It is the 24" model S24A400VEU and I selected it because you can pivot the monitor into portrait mode and it also includes audio and a webcam, which might come handy in the future but are not needed right now.
Installing Magic Mirror²
First, you need to create the Raspberry OS on an SD card. Raspberry OS is the recommended operating system for a Raspberry Pi. Other flavors of Linux like Ubuntu might also work. You can use the application Raspberry Pi Imager for an easy way to write Raspberry OS to your SD card.
Then, you insert the SD card into your Raspberry Pi and follow the instructions on the screen to connect your Raspberry Pi to the network and configure your keyboard and other steps.
Once you have an internet connection, you can install the Magic Mirror² software. You can follow the instructions for manual installation on the Magic Mirror² website.
For my purposes, I want to use the operating system in pivoted portrait mode. Therefore, I set the screen rotation in the Raspberry OS under the main menu "Preferences", "Screen Configuration" and then "Configure", "Screens", "HDMI-1", "Orientation" to "left".
Do not forget to apply the settings. They are subsequently persisted and also work after a reboot.
Installing Modules
Magic Mirror² comes with a number of pre-installed modules that show the time, holidays and news. In most cases, you would want to customize Magic Mirror² and install other interesting modules. There is a long list of ready-made third-party modules available to be installed on your system.
Once you have found a suitable module, you need to go into the root installation
directory of MagicMirror on your system (for example /home/pi/MagicMirror). There is the modules directory
located where you need to go.
cd modules
On the GitHub website of the module you want to install there is a green button "Code" and when clicked you can copy the HTTPS link for cloning.
Pasting the HTTPS link into your terminal you can clone the module source code into your modules folder,
like so:
git clone https://github.com/mrVragec/MMM-mvgmunich.git
In my case above, I installed the module MMM-mvgmunich for the public transport system in Munich. You need to adapt
the URL to your selected module.
After the successful download of the source code, you need to install any possible JavaScript packages via:
npm i
Then you need to edit the file config/config.js and add the properties of your module. What information
you need to add is documented in each module's documentation on GitHub.
For the MMM-mvgmunich module the properties look like this:
  {
        module: "MMM-mvgmunich",
        position: "top_right",
		config: {
          haltestelle: "Karlsplatz",
          maxEntries: 15,             // 10 items on screen
          updateInterval: 60000,      // 60 s
          showIcons: true,            // Show transport type icon
          transportTypesToShow: {
              "ubahn": true,            // show ubahn route
              "sbahn": true,            // show sbahn route
              "bus": true,              // show bus route
              "regional_bus": false,     // show regional bus route
              "tram": true              // show tram route
          },
          ignoreStations: [],         // destination not to be shown
          timeToWalk: 0,             // 10 min walking time to station. Default is 0
          showWalkingTime: true,     // if the walking time should be included and the starting time is displayed
          showTrainDepartureTime: true,     // show tran departure time
          trainDepartureTimeFormat: "absolute",   // format of the train departure time
          walkingTimeFormat: "relative"    // format of the walking time
        }
  }
There you can adapt the module to your needs by changing values, for example I could
disable the showing of icons by setting showIcons to false.
Each module has different customization possibilities, so you need to check the documentation.
Once you have saved your changes in the config/config.js file you can go to the root folder
of your Magic Mirror² installation and run:
npm run start
Once you see that everything is fine, you can configure Magic Mirror² to run automatically on every boot of your Raspberry Pi.
Autostarting
When you need to autostart Magic Mirror² on every boot of your Raspberry Pi you can follow the instructions on the Magic Mirror² website.
The important part is to follow the configuration using PM2 which you need to install separately. PM2 is a production process manager for Node which can autostart Magic Mirror².
Conclusion
Dashboards can be useful not only for businesses but also for private home use. They facilitate the display of useful information that enable also private persons to make sense of the world easily. Magic Mirror² in combination with a single board computer like Raspberry Pi and a computer monitor makes this technology available for wider adoption.
References
-
Magic Mirror²: https://magicmirror.builders/
-
GitHub source code Magic Mirror²: https://github.com/MichMich/MagicMirror
-
3rd party modules: https://github.com/MichMich/MagicMirror/wiki/3rd-Party-Modules
-
Raspberry Pi: https://www.raspberrypi.com
-
PM2: https://pm2.keymetrics.io/
Published
31 May 2022

Written by Thomas Derflinger
I am a visionary entrepreneur and software developer. In this blog I mainly write about web programming and related topics like IoT.